In my last post, I talked about reasons you used network automation, why you should care, and an introduction to Ansible as an automation tool. Well, the file structure that is. In this post, I’d like to show what goes into each file, how each of these files contribute, and an example playbook or two at a basic level.
The Heart of Ansible: Playbooks
A playbook is a set of tasks. Just like any programming language, Ansible supports conditionals, iteration, and error handling functions that will be covered in the near future. For now, let’s cover the foundation before we branch out.
Ansible iterates through a set of devices in your inventory. This process is multithreaded and you can limit the number of processes if you believe your Ansible host has limited process capacity. If a host passes running a task, it moves onto the next task. If it fails a task, it is cut out of the playbook and does not finish the set of tasks. However, this does not stop the other hosts.
There are two exceptions to this rule: the “ignore_errors” clause which will continue to run future tasks for a host, and the “any_errors_fatal” clause, which will cut all hosts out of a task if one fails. “any_errors_fatal” is good in a situation where maybe you’re pushing a software upgrade to a specific set of model of devices and catching one go bad is better than catching 50 of them (I mean, you don’t want to get fired, right? :)).
Ansible files
I covered the file names in last post, but not the actual contents. Let’s go over the various files we covered at the end of the last post.
File:
ansible.cfg
Example Code:
[defaults]
inventory=hosts
gathering=explicit
transport=local
host_key_checking=False
log_path = ~/.ansible/log/ansible.log
host_key_auto_add = True
retry_files_enabled=false
roles_path=roles/
Before we proceed, the playbook being used in this post will be run on Ansible 2.4.0.0, so there may be syntax differences between it and older versions you may be using.
- inventory=hosts
- Specifies where the inventory file is located. In this case, it’s called “hosts” in the current directory
- gathering=explicit
- By default, Ansible attempts to gather “facts” from a device unless you tell it not to. With the above clause, it disables fact gathering by default and you must specify you want fact gathering when running a playbook. Fact gathering will be covered later.
- transport=local
- This clause only applies to select network devices, so make sure any Linux boxes you run have are in a separate play with a separate config file. With network vendor oses like IOS, IOS-XE, and EOS though, you will need it. Cumulus is an exception to that rule.
- host_key_checking=False
- Optional if you want to disable key checking. Key checking is done in the “known_hosts” file on your local device, and will throw an error if the key changes. This is for the purpose of mitigating MiTM attacks, but it is not uncommon for some to regenerate SSH keys occasionally, so disabling it may be necessary
- log_path=”path”
- Self explanatory. Where the log file is located.
- host_key_auto_add=True
- Auto adds the SSH key to “known_hosts”. If this is not enabled, then Ansible will prompt for adding the key, however hosts running tasks in the background will fail until the playbook is reran. It is advised to enable this
- retry_files_enabled=false
- Retry files will populate with a “.retry” extension of a playbook if a task fails. The .retry file will display failed hosts. I personally don’t like removing these things when rerunning a playbook, so I just disable them
- role_path=roles/
- Path for your roles ran within your master playbook. Roles are a deep topic and will be discussed in a later post
File:
hosts
Example Code:
[all:vars]
ansible_python_interpreter="/usr/bin/env python2"

[Switches]
SW1 ansible_host=192.168.1.12
SW2 ansible_host=192.168.1.13
SW3 ansible_host=192.168.1.14
SW4 ansible_host=192.168.1.15

[Routers]

IOSV1 ansible_host=10.11.10.16
IOSV2 ansible_host=10.11.10.17
IOSV3 ansible_host=10.11.10.18
IOSV4 ansible_host=10.11.10.19
IOSV5 ansible_host=10.11.10.20

[Network-Physical:children]
Switches
Routers
Pay special attention to details here. This is where you define your devices to run in the playbook. Each device is classified into a group, like so:
[Routers]
If you call the group “Routers” later, you can iterate through them and run a particular task. Notice the “ansible_host” variable defines the IP. This is a globally recognized variable in Ansible, so keep note.
Next, you will notice the following:
[Network-Physical]:children
The “Children” clause allows for inheritance of two or more groups. The benefit of this is rather than running the same playbook on two different groups, you run it on a “parent” group (In this case, Network-Physical), and it will run the playbook for all child groups in the parent group
[all:vars]
You may define variables here, although it really depends on your playbook structure. the “all” clause will supersede ANY other variables defined within the hosts file that fall under group or hosts-specific attributes. Group or host-specific attributes could look something like the below:
[Routers:vars]
[IOSV1:vars]
Directory:
group_vars/host_vars
Within this directory, you would assume accurately that this is where the variables for the devices are defined. Each variable file uses YAML syntax (Humorously named “YAML ain’t markup language”. That’s right, it’s recursive) which is an easier-to-read version over JSON, and MUCH easier to read than XML. Here is a couple examples:
File:
group_vars/Switches.yml
Example Code:
network_lab: username: username123 password: password123 vlans_common: - vlan_id: 801 name: User - vlan_id: 802 name: VoIP - vlan_id: 804 name: "Wireless LAN"
File:
host_vars/SW4.yml
Example Code:
vlans_common:
- vlan_id: 1101
name: industrial_control
- vlan_id: 2005
name: Netapp_Infrastructure
If you remember earlier, there is a particular precedence in which variables are ordered. The below is a good list to go by for variable precedence when writing playbooks:
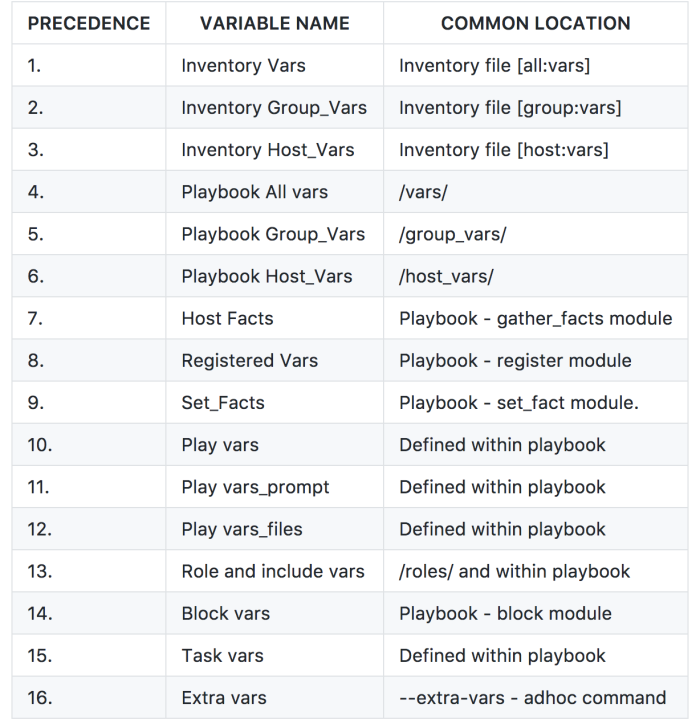
Keep this for reference and let’s wrap up on variables before running a simple playbook.
Directory:
roles/
I am not going to go in-depth on this post with roles, but it is worth noting for all of you that enjoy a “Modular” approach to your playbooks, this is your way forward. Think of it this way: You have the following roles:
- AAA
- Management
- NMS
- Netflow
So, the first three are mostly universal on your device. AAA is going to be pretty consistent unless your TACACS/RADIUS shared keys differ per device or device group. Management will be mostly standard, NMS will contain things like the Syslog server, NTP, DNS, etc, so those should be all the same for the most part (Assuming your environment isn’t excessively complex). Netflow, however doesn’t have support on many devices and may only be needed in specific situations, so this is where you can pick and choose what you want. Rather than write out these huge playbooks for each device, you write pieces that represent specific functions and allocate the pieces the devices need. I will give a simple example of how this would be represented in the playbook at the end of this post, but an actual role setup will be done in a future post.
Writing your first Playbook:
Before we start, let’s make sure we have the following installed prerequisites installed:
- Python 2.7
- Windows users: Download from site: https://www.python.org/download/releases/2.7/
- Mac OS users: Download from site OR install with homebrew:
brew install python. There is a recommended install, but I don’t recommend using it. - Linux users:
apt-get install pythonfor Debian-based distros oryum install pythonfor Redhat-based distros
- Ansible 2.4 (https://docs.ansible.com/ansible/latest/intro_installation.html)
- Windows users: Does not work natively on Windows. Install docker (https://www.docker.com/) For getting it working, check out this post: https://medium.com/@tech_phil/running-ansible-inside-docker-550d3bb2bdff
- Mac OS users:
brew install ansible - Linux users:
apt-get install ansibleoryum install ansible
- Install SSH pass on Linux/Mac. See instructions here: https://gist.github.com/arunoda/7790979
- A text editor for easy, streamlined editing. I use Sublime
- Host entries in your /etc/hosts file. For my hosts above, it should look something like this:
192.168.1.12 SW1
192.168.1.13 SW2
192.168.1.14 SW3
192.168.1.15 SW4
10.11.10.16 IOSV1
10.11.10.17 IOSV2
10.11.10.18 IOSV3
10.11.10.19 IOSV4
10.11.10.20 IOSV5
Let’s get to it!
Ansible Playbook: show_output.yml
This playbook will run the command “show run | include ntp” on all devices in the “Routers” group, and will only return in the output the lines that contain “ntp server” in them.
---
- name: NTP Servers Output
hosts: Switches

tasks:
- name: show NTP Info
ios_command:
commands:
- show run | include ntp
provider: "{{ network_lab }}"
register: output

- name: Drill down to NTP servers
debug:
msg: "{{ inventory_hostname }}": {{ item }}
with_items: "{{ output.stdout_lines }}"
when: "'ntp server' in item"
Let’s go through this playbook. The “—” is ALWAYS at the top of a YAML file. That includes the group_vars files we talked about earlier. Next, let’s pick apart each of these parts of the playbook:
- Name – Picks a name for the task (Optional, but encouraged)
- Hosts – The hosts you are running this playbook on. Your options are either a group, a host, or all
- tasks – Where your tasks are defined
- ios_command – A module specific to Cisco IOS that can run show commands. More information on syntax can be found here: https://docs.ansible.com/ansible/latest/ios_command_module.html
- provider – The {{ network_lab }} denotes a variable IN the playbook being pulled from our array of variables. In this case, it comes from the
Switches.ymlfile in the group_vars folder. This is where your username/password are pulled in. Theauthorize: yesclause may be appropriate if you aren’t automatically elevated to privilege 15 in your router/switch (Defined under the network_lab variable in group_vars) - register – Registers the output of the task that was just ran. “Output” is arbitrary and be named to whatever you like (Since it’s a variable)
- debug: msg: – Debugs with a message. In this case, it is
{{ inventory_hostname }}: {{ item }}. inventory_hostname is the current hostname being ran, so for example, SW1 could be the hostname. “Item” is an iterable and is defined in the following clause - with_items – Defines a list of items for the {{ item }} variable above. In this case,
{{ output.stdout_lines }}. Remember our “register” statement used output, so stdout_lines is the output in a newline-delimited list of the output (stdout is an option as well). - when – A conditional, similar to a “if/then/else” statement. In this case, the line in
{{ item }}needs to contain “ntp server”.
Now, let’s run the playbook!
MacBook: bobman$ ansible-playbook show_output.yml
PLAY [SNMP Configuration Output] ***************************************************************************************
TASK [show hostname] ***************************************************************************************************
ok: [SW2]
ok: [SW3]
ok: [SW4]
ok: [SW1]
TASK [Get SNMP Facts] **************************************************************************************************
skipping: [SW1] => (item=ntp source Vlan999)
skipping: [SW2] => (item=ntp source Vlan999)
skipping: [SW3] => (item=ntp source Vlan999)
ok: [SW1] => (item=ntp server utcnist.colorado.edu) => {
“item”: “ntp server utcnist.colorado.edu”,
“msg”: “SW1: ntp server utcnist.colorado.edu”
}
ok: [SW2] => (item=ntp server utcnist.colorado.edu) => {
“item”: “ntp server utcnist.colorado.edu”,
“msg”: “SW2: ntp server utcnist.colorado.edu”
}
skipping: [SW4] => (item=ntp source Vlan999)
ok: [SW3] => (item=ntp server utcnist.colorado.edu) => {
“item”: “ntp server utcnist.colorado.edu”,
“msg”: “SW3: ntp server utcnist.colorado.edu”
}
ok: [SW4] => (item=ntp server utcnist.colorado.edu) => {
“item”: “ntp server utcnist.colorado.edu”,
“msg”: “SW4: ntp server utcnist.colorado.edu”
}
ok: [SW1] => (item=ntp server time-c.nist.gov) => {
“item”: “ntp server time-c.nist.gov”,
“msg”: “SW1: ntp server time-c.nist.gov”
}
ok: [SW2] => (item=ntp server time-c.nist.gov) => {
“item”: “ntp server time-c.nist.gov”,
“msg”: “SW2: ntp server time-c.nist.gov”
}
ok: [SW3] => (item=ntp server time-c.nist.gov) => {
“item”: “ntp server time-c.nist.gov”,
“msg”: “SW3: ntp server time-c.nist.gov”
}
ok: [SW4] => (item=ntp server time-c.nist.gov) => {
“item”: “ntp server time-c.nist.gov”,
“msg”: “SW4: ntp server time-c.nist.gov”
}
PLAY RECAP *************************************************************************************************************
SW1 : ok=2 changed=0 unreachable=0 failed=0
SW2 : ok=2 changed=0 unreachable=0 failed=0
SW3 : ok=2 changed=0 unreachable=0 failed=0
SW4 : ok=2 changed=0 unreachable=0 failed=0
Pretty cool, eh? This was just a basic playbook. Enough was covered today. In the next post, be ready for some more advanced playbooks, as well as integration of some useful roles.
